do you want to become a expert in Hardware and networking.?
here is a small venture containing networking concepts, theories,software and IT tips and tricks..so go through it....
(Windows AIK or WAIK) is a collection of tools and technologies produced by Microsoft designed to help deploy Microsoft Windows operating system images to target computers or to a VHD (Virtual Hard Disk). It was first introduced with Windows Vista. The WAIK is a required component of the Microsoft Deployment Toolkit.[1]
Windows® Preinstallation Environment (Windows PE) 3.1 is being released as an Windows Automated Installation Kit (Windows AIK) supplement for Windows 7 Service Pack 1 (SP1). Windows PE 3.1 includes all optional components and language packs. You can apply these optional components and language packs to customize the boot.wim and winre.wim images that are part of the Windows 7 SP1 installation media.
STEP 1 Download the Windows AIK
This is a very large download (1.77GB). A broadband (high-speed) internet connection is highly recomended.
Once the WAIK file is downloaded, you'll need to burn it to a DVD. The file is in a .img format. Many burning programs like MagicISO, WinISO, etc. can handle the .img format. If you don't have a program that will handle it, you can download a free program called ImgBurn. ImgBurn will burn the .img file directly to a DVD.
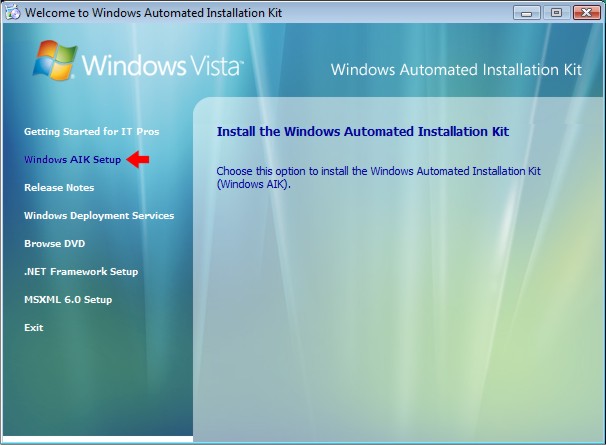
STEP3 Install Windows AIK
# Insert DVD And Run Startcd.exe
Click on Continue
The main installation window should now display. Select the Windows AIK Setup option to begin the installation.
. Or You can Read below to know how to do itManually.
Now a days all the people use USB Flash drives like Pendrive, External Hard Disk and Many more. They all skipped DVD, CD and all optical Disc because it takes time to copy and it cannot be reused. So USB Pendrives are now with all people. I used to see all over my college, they hang USB pendrive in their necks. They carry Music, Movies, Data in that. How USB flash drives improves as the mean while USB virus also increases along with that.
If you have some nasty virus on USB drive that hide all your file in the drive i.e; hides your files and folders, creates .exe file extensions of your folders and even corrupt your files. You can view these files by going to Tools>>Folder Options ..But the attributes of these files often stay unchanged even if you uncheck hidden attribute on file/folder properties.
Here i am going to tell the Permanent Solution for recovering hidden files by Command prompt in windows operating system.
STEP ONE:
Plug your USB Pendrive or External HDD or Memory Card which is Affected.
STEP TWO:
Go to Start -> Run-> Type CMD and Enter
STEP THREE:
Find the drive letter for the connected USB drive. For Example, I:
In command prompt, type I:
and Hit enter. Command Prompt will show I:/
STEP FOUR:
Then type
attrib -s -h /s /d *.*
Make sure that you put space between each elements in the code.
The Add Remove programs feature in the control panel shows us the list of all programs installed in the PC. Due to some reasons if we don’t want any particular programs to show up in the list, use the following trick to hide programs from add/ remove programs list in control panel.
The program list which is shown in Add/Remove programs is collected from registry path shown below.
So all we need to do is to go to that particular uninstall entry of the program and change the display name. Here I will show you an example on how to hide Yahoo Messenger from Add Remove programs list. Similarly you can do the same trick to hide programs like utorrent, Google Talk, MSN Messenger, Facebook Messenger etc.
How to hide Programs from Add/Remove Programs list.
—>Example shown below explains us how to hide Yahoo Messenger.
Click Start and type Regedit.exe
Right click on regedit.exe and select Run as Administrator. [You’ll require admin rights to edit registry]
Now you can see the options coming up for Yahoo Messenger in the right pane of registry editor.
In the right pane, Select DisplayName.
Right click on DisplayName and select Rename.
Now change it any other value, like for example you can change it to NeverDisplayName or NoDisplayName.
After completing this trick, Yahoo Messenger program will not be shown in the Add/Remove programs list.
Similarly you can repeat the same trick to hide other programs which you want to hide from Add/Remove programs list, like Messengers, Utorrents, download managers etc. This hack for hiding programs from control panel will work on Windows Vista,Windows 7,Windows XP and Windows 8
Download Avast License File, Open Avast Antivirus And Go To ” Maintenance ” Tab, Click On ” Subscription ” Sub Tab Then Click On “Insert License File” Button and Put Downloaded License File.
Windows XP Service Pack 2 or higher (32-bit or 64-bit)
Minimum Hardware Requirements
Pentium 3 Processor
256 MB RAM
380 MB of free hard disk space
“Note”
Avast Internet Security runs only on PCs with Windows XP and newer. Older Windows operating systems (Windows 95/Windows98/Windows ME/WinNT/Windows2000) are not supported.
Now Avast Antivirus Launched for Mobile Devices
Remove other antivirus and install Avast World #1 Antivirus for PC
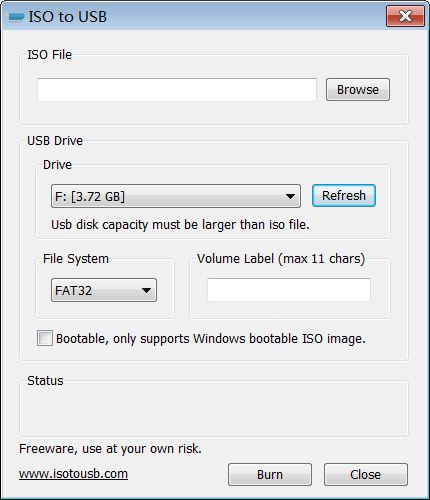
This is the main interface of ISO to USB, running on Windows 7 (64 bit) systems. Run this software, you need to have administrator privileges on your PC.
USMT 4.0 is a command-line utility that allows you to automate the process of user profile migration. The USMT is part of the Windows Automated Installation Kit (WAIK) and is a better tool for performing a large number of profile migrations than Windows Easy Transfer. The USMT can write data to a removable USB storage device or a network share but cannot perform a direct side-by-side migration over the network from the source to the destination computer. The USMT does not support user profile migration using the Windows Easy Transfer cable. USMT migration occurs in two phases, exporting profile data from the source computer using ScanState and importing profile data on the destination computer using LoadState.
USMT 4.0 allows you to capture user accounts, user files, and operating system and application settings. The USMT tool also migrates access control lists (ACLs) for files and folders, ensuring that permissions set on the source computer are retained on the destination computer. You can use USMT to migrate profile data to computers running Windows 7 from computers running Windows XP, Windows Vista, and Windows 7. You can also use the USMT to migrate data from computers running Windows 7 to Windows Vista. You cannot use USMT to migrate mapped network drives, local printers, device drivers, passwords, shared folder permissions, and Internet connection sharing settings.
Note You cannot use the USMT to migrate data from computers running Windows 7 to computers running Windows XP.
Unlike Windows Easy Transfer, where you select the particular items you want to migrate when you are running the application, with USMT, you configure a set of migration rules prior to the migration that specify what data to export from the source computer.
There are four different .xml migration files used with the USMT:
MigApp.xml This file contains rules about migrating application settings. These include Accessibility settings, dial-up connections, favorites, folder options, fonts, group membership, Open Database Connectivity (ODBC) settings, Microsoft Office Outlook Express mailbox files, mouse and keyboard settings, phone and modem options, Remote Access Service (RAS) connection phone book files, regional options, remote access, screen-saver settings, taskbar settings, and wallpaper settings.
MigUser.xml This file contains rules about user profiles and user data. The default settings for this file migrate all data in My Documents, My Video, My Music, My Pictures, desktop files, Start Menu, Quick Launch settings, favorites, Shared Documents, Shared Video, Shared Music, Shared desktop files, Shared Pictures, Shared Start menu, and Shared Favorites. This file also contains rules that ensure that all the following file types are migrated from fixed volumes: .qdf, .qsd, .qel, .qph, .doc, .dot, .rtf, .mcw, .wps, .scd, .wri, .wpd, .xl*, .csv, .iqy, .dqy, .oqy, .rqy, .wk*, .wq1, .slk, .dif, .ppt*, .pps*, .pot*, .sh3, .ch3, .pre, .ppa, .txt, .pst, .one*, .mpp, .vsd, .vl*, .or6, .accdb, .mdb, .pub, .xla, .xlb and .xls. The asterisk (*) represents zero or more characters.
MigDocs.xml This file contains information on the location of user documents. n Config.xml This file is different from the other migration files as it is used to exclude features from the migration. You can create and modify the Config.xml file using ScanState.exe with the /genconfig option.
It is also possible to create custom XML files to be used with the migration. For example, you can create a custom XML file that reroutes folders, specific file types, or specific files. You would use rerouting if you wanted to move all the files of one type, such as .avi files, that may have been stored in different places on the source computer to a specific folder on the destination computer.
SCANSTATE
You run ScanState on the source computer during the migration. You must run ScanState. exe on computers running Windows Vista and Windows 7 from an administrative command prompt. When running ScanState on a source computer that has Windows XP installed, you need to run it as a user that is a member of the local administrators group. The following command creates an encrypted store named Mystore on the file share named Migration on the file server named Fileserver that uses the encryption key Mykey: scanstate \\fileserver\migration\mystore /i:migapp.xml /i:miguser.xml /o /config:config.xml /encrypt /key:"mykey"
Running ScanState and LoadState with the /v:13 option creates a detailed log file. You should use this option if you are having problems migrating data.
LOAD STATE
LoadState is run on the destination computer. You should install all applications that were on the source computer on the destination before you run LoadState. You must run Loadstate. exe on computers running Windows Vista and Windows 7 from an administrative command prompt.
To load profile data from an encrypted store named Mystore that is stored on a share named Migration on a file server named Fileserver and which is encrypted with the encryption key Mykey, use this command:
Recently Samsung released ICS 4.0.4 XWLPX for Galaxy S2 (I9100) with minor bug fix and some improvements. This is the latest ICS version for Galaxy S2 so far. In some countries users can update to this version Over The Air (OTA). If this update not available in your country you can manuallyupdate the version using Odin.
This post describe the steps to manuallyupdate your Samsung Galaxy S2 to ICS 4.0.4 XWLPX using Odin.
Note : 1. Backup your important data. 2. Enable USB debugging in your phone. 3. Battery must have 60% or more charge. 4. Disable or Exit Antivirus and Kies if you are installed. 5. Your PC must install Kies or Galaxy S2 driver.
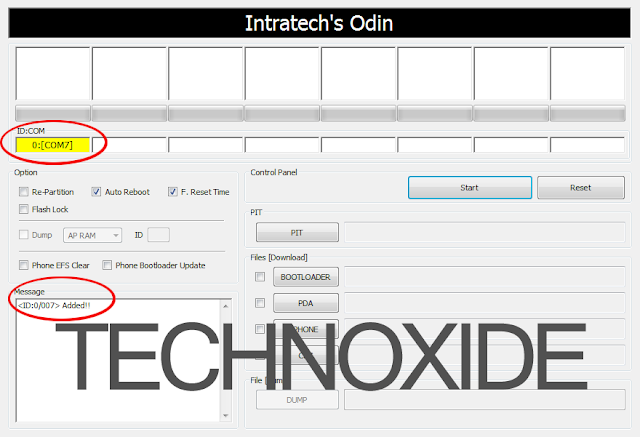
Steps: 1. Download ICS 4.0.4 XWLPX from here 2. Download Odin from here 3. Extract the Update fileI9100XWLPX_I9100NEELP5_NEE.zip (You will get two filesI9100XWLPX_I9100XXLQ6_I9100NEELP5_HOME.tar.md5and SS_DL.dll). 4. Now, Extract and Open odin3 v1.85.exe. 5. Power off Galaxy S2. 6. Now boot in to download mode. ( Press and hold : Volume down key and Home button ( Center button ) ,now press and hold the power button to boot in to download mode) 7. In download mode connect your phone to PC. 8. Now look in Odin... ID:COM box will be yellow with a port name and Added! message will be displayed.
If not...then it will be the problem of your driver or USB cable ...recheck it.
9. In Odin..Click PDA and browse the update fileI9100XWLPX_I9100XXLQ6_I9100NEELP5_HOME.tar.md5 and Click Start.
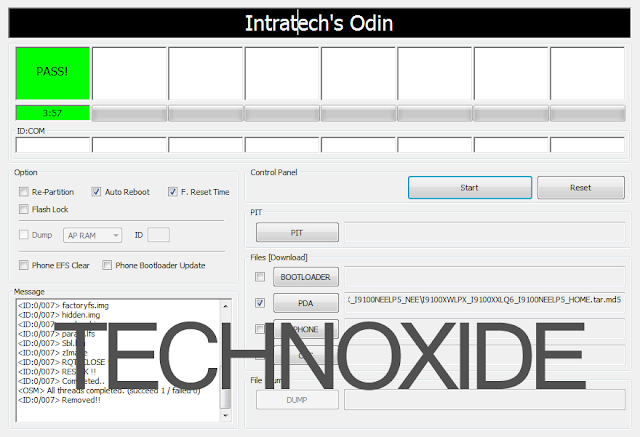
10. After complete update Odin will show PASS on top left and phone will reboot. now unplug phone from USB.
Done !
Note : If the phone stuck at the boot screen...1. Remove and reinsert your battery. 2. Now boot into recovery mode. (Press and hold the Volume up and Home button ( Center button ) ,now press and hold the power button to boot in to recovery mode. 3. Apply wipe data/factory reset. 4. Apply wipe cache partition. 5. Finally reboot system...
PRORAT is a powerfull remote administrator tool(RAT) or you can say it Trojan. ProRat was written in C++ programming language and its capable to work with all windows operating systems.
To make process and connect to a PC with ProRat v2.0 you must create a server with your own properties by using the client. Send the server to the PC' you want to connect and be sure that he opened the server. IP address, port number and server password will be sent to the notification address you set when creating the server. Write all of the information we sent you to the client and then Click on the "Connect" button. You will be connected to the server. if you want to logoff from the server click on the "Disconnect" button. All kind of user problems with PRORAT you can solve in http://www.prorat.net/forum
You can use prorat for a legel connection and for a hacking purpose.
Tips which can help you when connecting through prorat. To connect to a PC with ProRaT client the server should not have to be directly connected to internet. so if the PC is behind a network and has a IP address like “192.168.0.* or if its behind a Router and has a IP like “10.*.*.* you will beable to connect with PRORAT, you must be a Special Edition user to do this process. Public Edition users can not use reverse connection to connect to PC 's behind networks and routers. You can only use Reverse Connection feature which you can connect to PC's which are behind networks and routers in PRORAT SPECIAL EDITION. PRORAT will not send any keylogg files or any passwords to your email address. PRORAT is a "ProHack Remote Administrator Tool" you can only get the keylogg files and passwords you want to learn by connect to the victims PC. You can connect to all PC in your country and other country’s as well. If the victim is connected to internet this will be enough. If you cant connect to a victim this doesn’t mean that you cannot connect to all victims. Please try new victims and you will see that it will connect. If you still cant connect to a victim after trying few times read the help file and try to find where you are making a mistake and feel free to ask us questions if you still have problems. If your or your victims PC is being forced to closing after you started PRORAT server or ProConnective this is not PRORAT fault because some kind of worm virus like msblast can infiltrate to PC which doesn’t have security patches. PRORAT will close the Firewall (optional) and this will give a chance to this kind of worms to infiltrate and close systems. To take measures please read the help file and you will see links to download patch files. If you try to make PRORAT server undetectable to AntiVirus the PRORAT will not connect to the server. If you want a server which is undetectable from AntiVirus you must buy PRORAT SPECIAL EDITION, If you didn’t try to change server and you still get a connection reject message, possibly the server wasn’t installed properly to the victims PC.
You can download it from here or mail me DISCLAIMER: Installing trojan on others computers you do not own or do not have permission to monitor. may violate local, state or federal law. Spying other people's activities or breaking into other people's computer without their permission can be considered illegal by the courts of many countries. The software reviewed here is ONLY for authorized system administrators and/or owners of computers. We assume no liability and are not responsible for any misuse or damage caused by the software. The end user of this software is obliged to obey all applicable local, state, federal and other laws in his country of residence. Every tutorial is for educational purpose only.
PRORAT - Remote pc access software:
1. Download PRORAT software for remote pc access. Password: techotips.blogspot.com
Alternative download link for PRORAT software. password: netcrew password for prorat v1.9: pro (If netcrew doesn't work).
2. Unzip downloaded file using Winzix (download here) to use this remote pc access software
3. Now, the unzipped file will contain Prorat.exe file. Run the file on your computer.
4. Now, we have to create a server to send it to remote computer for remote pc access. So, click on Create ->Create Prorat server.
5. Go to no-ip.com and register for an account.
6. Now, in Pro connective notification, enter in IP(DNS) address, the link provided to you by no-ip and let all remaining fields remain unchecked.
7. Alongwith using Pro connective notification, you can even use your mail address to confirm about server installation.
8. You can even bind the server with a specific file to prevent victim knowing about the server installation on his computer.
9. To change server default icon, click on "Server icon" on leftoption pane and select any suitable icon according to binded file.
10. Now, when all things are done, hit on "Create server" and you will get server created in Prorat directory. This server is used for remote pc access.
11. This ends server creation part over here. Just refer Remote pc access tutorial for more information.... the best PRORAT tutorial i found.
You will require to have Winzix to get PRORAT - remote pc access software. Download Winzix here.
Now, when you have created PRORAT server, next step is to send this server to victim computer and then use PRORAT for remote pc access. You can use Crypter software and even Binder to avoid our server trojan from being detected by antivirus. I will explain in my next article about how to connect to remote PRORAT server on remote victim computer and then use this for remote pc access. If you have any problem in using this PRORAT for remote pc access, please mention it in comments section.
So, some crypters and viruses are now detected as hacktools by antiviruses and are of no use now. Bunn has created Fly Crypter which has unique stub generator. So, you can create your own stub and so your crypter becomes your own private version crypter because you can assign and use new stubs to viruses and thus helping your virus program to remain FUD.
How to make Virus undetectable:
Usually, Viruses are detected because their stubs are detected as viruses by AVs. So, if you change stub of viruses, most of times, they become undetectable to antiviruses. So, I am explaining you how to create your own stub and how to use this your self-created stub to make your virus FUD (Fully UnDetecatable) to antiviruses. This Crypter is tested by me and found working well on Windows XP and Windows Vista. 1. Free Download Fly Crypter + Unique Stub Generator software.Here Password: techotips.blogspot.com
2. Run AUSG.exe file on your computer to see: Make virus trojan FUD
3. Select "Str. Encr." and "Stub Encryption" options as I have selected above. Now, hit on "Generate my Stub". Allow some time for AUSG.exe to generate stub for you. After sometime, you'll get a confirmation message.
4. Now, hit on "Compile my stub" and you'll again get message like this: Compile stub
Note: If you get error messages over here, repeat from Step 2 using "Random Passwords length" value less than 5.
5. Now, move on to directory containing Fly Crypter and AUSG.exe file. You will now see around 4 or 5 random string newly created files. One of those files is your newly created FUD Stub. Let this be "XlbAtKQ.exe".
6. Now, open Fly Crypter.exe. Create Apocalypse server and simply drag and drop this server on Fly Crypter.
7. Right click on server.exe, select Main Options -> Custom Stub and new popup box will be displayed. How to make your own stub
Now, browse to your newly created stub "XlbAtKQ.exe" and hit OK. Select any password level and hit OK.
8. Again Right Click -> Crypt files and enter the name and path where you wanna save the newly created crypted virus file.
9. Now, you have your crypted file ready to hack passwords and access pc remotely for you. Go to novirsthanks.org and scan your stub and crypted file. You will find the detection rate decreased significantly.
Note 1: For AUSG.exe to compile your stub, you should haveMicrosoft Visual basic 6 installed on your computer.
Note 2: If you aren't getting FUD stub, just select the antiviruses you wanna bypass. Now, create stubs and start scanning them at novirusthanks.org. This method is used to collect and group stubs undetectable by specific antiviruses. Here is one stub which is not detected by most famous AVs as today's scanner results indicate: - Avira - AVG - Avast - Bit Defender - Kaspersky - Quick Heal - Panda
Free Download this Stub over Password: techotips.blogspot.com
Update: This method is not working 100%. As some of the readers have reported this to be not working with many keyloggers like Ardamax keylogger, General keylogger and so. (Thanks George, Riya and Central2000 for your valuable feedback). So friends, try this out with your server whether if this works and please mention your feedback. If this is not working for you, try out crypter softwares.
Develop your own stubs. Now, all resides on you to make your trojans and viruses undetectable, since you are now able to develop your own stubs.
So friends, I hope this tutorial on how to make your own stubs to make your virus trojan undetectable by antiviruses will be helpful to you. If you have any problem in using Fly Crypter and AUSG.exe files to make your own stubs, please mention it in comments.


